Sunday 31 March 2013

DIY Digest: All Jumped Up

A simple two-step refashion, one giant leap into spring/summer style.


With the jumpsuit making many an appearance in spring/summer 2013 fashion, and recycling gaining ever more ground in general relevance and necessity, I thought I'd kill two birds with one stone and teach you how cutting up old trousers and a top can be an easy way to craft your own jumpsuit. Jumpsuits seem like a logical juncture in the light of the huge and omnipresent onesie trend, which has seen many an over-zealous wearer taking them to the streets and beyond the confines associated with conventional loungewear. That's right, kids. Andy Pandy is still your muse and conceptual inspiration, only call me old-fashioned but I prefer to interpret the look in the jump- and playsuit form to glorified sleepsuits!

You will need


A top with a fastening at the back of the neck, the longer the better

Trousers - make sure they're not jersey and that you can get them on without the help of any fastenings. Hareem pants are ideal, as are any trousers that are a size bigger than you typically take

Thread which matches/ compliments your clothes

Sewing machine

Seam ripper

Fabric scissors

Gold gel pen

Patternmaster or graded setsquare

10-20cm elastic about an 2.5cm in width

Pins


Time

1-2 hours


Difficulty

Very easy

I'd say it was about as easy as anything involving sewing can get.

Jump to it!


Using your seam ripper, unpick the waistband from your trousers. If they have a fly or any other type of fastening, get rid of that and sew the remaining seams together.


Pin your elastic to the centre back (where there's usually a seam), stretch it out by the same distance at either side so that it's under tension and, using a slightly zigzagging stitch, sew it at the ends and along the length. This pulls the trousers in at the waist once you've slipped them on, so that they don't gape.


Try on the top with the trousers and use your gel pen to mark out where the two meet. Mark at regular intervals.


Join your marks up and use your patternmaster/ graded setsquare to draw a line 2cm below your marks.Cut along that line.


Pin them with the trousers inside the top and with right sides of both garments facing each other. Sew 1cm from the edge.


Sunday 24 March 2013

DIY Digest: Record time with Olympia Le Tan

Just for the record, Parisian fashion label, Olympia Le Tan, has retro-fabulous in the bag!

Image: Style.com

Perhaps a busy work schedule, coupled with the above inspiration (namely the Olympia Le Tan Record Bag) can render me the only person above the age of 6 to get excited by a pile of felt but that's exactly what I've been getting up to this week. Sorting the messy heap of jewellery that has been gathering dust and growing in size in my room was made especially satisfying when I espied an entirely size appropriate, well compartmented jewellery box - even more so when I decided what to do with it simply by covering it and decorating it.


You will need

Cylindrical bag or trinket box (I chose the latter as I figured I'd get more use out of it)

Gold gel pen

Small fabric scissors

Craft Mount

Embroidery thread and needle (optional)

Felt in:

Black

Purple

Dark blue

Turquoise

Green

Light Green

Orange

Red


Difficulty


Very easy

One might almost say childsplay! Cut, stick and no need to even colour in - except with in a basic fabric collage kind of a way.

How it's done

Simply trace around the edges of each section of your trinket box/ bag with your gel pen, cut them out and craft mount them in place.


The arrow I did freehand, eyeballing a centimetre further along the edge of each piece. The writing I embroidered in place.


Wednesday 20 March 2013

The Trends on Wednesday: Eastern Promise

Fire and phoenixes  symmetry and satin, jacquard patterns and Japanese landscape prints, fashion has, once again, looked to romance and mystique of the Far East for a vibrant spectrum of inspiration. While clichés of dragons and fans may betray yet another nineties fashion influence, having grown up in that decade, I will say the trend is among the more welcome of its retro throwbacks, tacky character tattoos excepted. The eclectic mix of blossom prints, intricate embroidery and geometric shoulder silhouettes has certainly captured the imagination of designers, from the couture atelier to the high street. Spring fashion has jumped on board the Orient Express for yet another exotic foray. Will you?

Author's note: Keep it here to see some simple DIY techniques for getting the look!


Sunday 17 March 2013

Overalls effect: How to transform old dungarees into a skater dress

Think after a successful week of collaborative excitement I've forgotten about my tutorials and my adoring public? Think again.


You will need


Comfortably close fitting dungarees (not baggy ones, in other words)

A square metre of floral fabric (Author's note: Lucky leggy ladies may require slightly more fabric, depending on how much coverage they'd like - or not!)

Cream lace trim (optional, but it's probably the easiest way to give the hem a nice finish)

Matching thread for your fabric and trim

Sewing machine

Iron and ironing board

Patternmaster or graded setsquare

Fabric scissors

Paper scissors

About a square metre of pattern paper

Strip of card about 60cm long (or longer if you'd like more length, see author's note above)

Pins

Ballpoint pen

Difficulty

Easy

Honestly, the only reason I didn't mark this as "Very easy" is that it requires sewing which, I appreciate is a technical skill and potentially a daunting prospect for some, but, seriously, this is as easy as sewing gets and not a bad project to start with if you're considering taking up dressmaking.


Time

About 2 hours.

To ad-dress the matter of quick recycling...


Take your strip of card, stick a pin at one end, measure and mark out a point 50cm from it. Measure halfway across the front of the waist of your dungarees and mark out a separate point for that length, so if the front of your waistband is 34cm wide, measure a point on your strip of card that's 17cm away from the pin. I'm sure that if a mathematician were doing this, they would calculate it more accurately using pi and all sorts (perchance even mash) but I still stand by my method and its ability to deliver the requisite goods.


Pin your card strip at in the middle of your fabric paper. Use your ballpoint pen to pierce through the two points you parked out so that your card works as a compass and your two new holes as reference points for drawing your 2 circles. Cut out your pattern paper. It should form a doughnut shape.


Meanwhile in dungaree camp, you need to mark out a 1cm seam allowance below the waist of your dungarees, using your patternmaster...


...and cut along the line.


Pin your circle of pattern paper to your fabric and cut it  out.


Sew your fabric circle to your dungarees and finish the hem, either by turning it under by 1cm and sewing it in place or by attaching some lace trim. Personally, I'd recommend the latter.

Thursday 14 March 2013

You asked for it: Pick Your DIY - the results

As you readers well know, I've been a busy bee, teaming up with six other exceptionally talented DIY bloggers including Cat Morley from Cut Out & Keep, Carly J. Cais of Chic Steals, Sylvia Salas of Dare to DIY, Donatella from Inspiration & Realisation, Auna from La Vie en Rose and Alessia from Matter of Style Here are the top 7 DIY entries you chose from our Pinterest board:


Saturday 9 March 2013

Beads of a Bird: How to DIY a Shourouk Phoenix Necklace

The Pick Your DIY challenge order was of a phoenix!

You will need

2 box chain necklaces

1 A4 sheet of fine sculpting mesh

Car body filler (If you're nervous about using it, strong, carpentry-standard contact adhesive will do but it requires much more patience)

All-purpose scissors

Palette knife

Long-nosed pliers

Thin silver wire


84 diamantés or crystal beads (if you're using the latter, you'll also need some silver foil)

Nail polish in the following colours:


Difficulty


Quite easy

Believe it or not there are only 2 parts of the process that prevent this tutorial from earning an "easy" or even "very easy" certificate (or whatever means by which you classify tutorial difficulty). Those were using the wire to join some of the chains and applying the body filler and gems near the end in a neat, non-messy way. Confused? Fear not, all will be revealed.


Time

About 2 and a half hours.

No, seriously, I was pleasantly surprised at how little time it took to construct the necklace. Embellishing it was a slightly slower process but it's all still comfortably doable within an evening's time frame.


Fly on the wings of DIY...


This video shows how (yes, figuratively smart-arse!):


That masterpiece again...


Sunday 3 March 2013

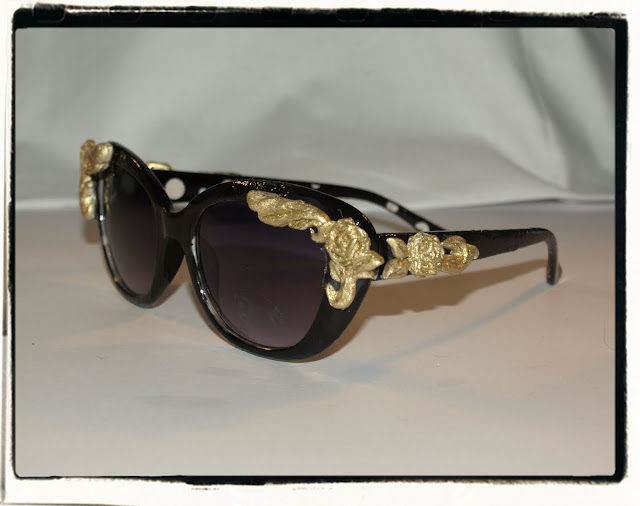
Go for Baroque - How to DIY Dolce & Gabbana-inspired cat eye sunglasses

Whoever said silence was golden clearly hadn't seen Dolce & Gabbana's epic statement sunglasses!


You will need

Black cat eye sunglasses (mine were £1 from Primark, no haggling required!)


Polymer clay (about £2 in most craft shops but prices may vary)


Gold polymer clay powder by Fimo (£3.25 at play.com)


Clear car lacquer (£3.49 with postage and packing on Ebay)


Scalpel (potentially deadly - what's your price?... Just kidding!)


Glue gun


Difficulty


Quite easy

It would depend on how fussy you want to make your clay design and how confident a small-scale sculptor you are, but if you follow my tips, it is easy once you know how.


Time

2 hours, excluding clay baking time and various drying times. The former will vary according to your choice of clay but they tend to need around half an hour or less.


Going for baroque...


If, like me, you're meticulous to an anal degree, you might want to sketch out two shapes for your flower designs - one for the top corners of the frames and one for the temples - and trace them through on both sides as a guide. This is to make sure that your shapes are more or less symmetrical and not a random hodge-podge. We don't do hodge-podges here at Chic Cheat, nor do we recommend you do such a thing!


As I mentioned, you're using your templates as a guideline. The best method for ornate leafy. rosy patterns that I know is to roll your clay into long sausagey shapes (ahem, no smirking please, ladies!), cut lines into them with a scalpel  and smooth them along the sides so that they have a kind of v-shaped cross-section and, thus, a faceted look.

For the roses, squash down domed, circular blob of clay and furrow holes out of it with a scalpel, pulling the clay above it up as you go along and creating a petal-like texture.


Once you've sculpted all your (master-)pieces, paint them with your gold powder and water, leave to dry (they may still molt slightly so try to avoid touching them) I'd recommend carrying them on a piece of paper to the oven for baking. Follow the instructions closely (unlike I once did when I misread 240°F for 240°C, resulting in an acrid mess - just throwing the idea out there!) and bake your clay.


Next, you'll need a good fixative. I used clear car lacquer. Just give your pieces one blast of it and leave them for a few minutes to dry.


Stick your pieces in place with a glue gun.

And finally...


...there you have it!