Sunday 23 February 2014

Take these broken rings - how to upcycle old jewellery to DIY a Vanessa Mooney Bright Lights handpiece


Left image: Nastygal.com

You will need...


NB: You will need your pliers for cutting - not all jewellery pliers can do this so make sure you use or invest in a pair that can.

Difficulty

Moderately easy

Despite being one of the quickest projects I think I've ever done, it has its fiddly, awkward moments which might prove a shock to the system if you're new to jewellery making.

Time

Half an hour.

Run the gauntlet...

Cut your chain so that it fits snugly but comfortably around your wrist. Attach jump rings to either end; use your pliers to open, close and secure them. Attach your lobster clasp to one of the jump rings.


Take your wrist chain off and fold it in half so that you can find the middle link - this is important for getting your middle chain concentric. Attach a jump ring and some chain to the middle link. Measure out and mark where the centre chain meets the bottom of your middle finger (even if you just mark it with your fingertips) and cut it. It needs to be cut in a place where it can be attached to a ring, and where the ring can sit comfortably on your finger - not too far down - so if there's any doubt as to which link needs to be cut, overestimate the length, rather than underestimating it.
Attach two jump rings to your main ring - one for the charm and one that will soon be used for your chain. Attach the charm.
Finally, attach your ring to your middle chain.


Sunday 16 February 2014

Fresh Eyes - How to DIY a Kenzo Lotus Eye Sweatshirt

Kenzo's eye is catching on!


Kenzo's eye motifs are huge, having caught the attention of bloggers and the imagination of the high street. Imagine my delight then, when I found an old red fleece gathering dust in my wardrobe and dreamt up a DIY strategy for getting the look!

You will need...


The fabric paints were by Dylon and priced £3 each.

The 3D paints were by Pebeo. I got them for the sale price of 50p each from a local art shop.

The foam was about 2cm thick and measured 50 x 50cm. I picked it up for the bargainous price of £1.50 from my local market. I can't recommend flea markets enough for getting great deals on fabric and other materials, so if you live near one, have a sniff around before you try any high street shops.

Difficulty

Pretty easy

It requires care and time, but it's not especially challenging, as long as you've got a steady hand.

Time

3-5 hours.

If you want to DIY my sweater...


Cut out your eye and petal design in foam. You can use the above picture as a template for tracing. The design is A3 size but if you don't have an A3 printer, spreading it over two sets of A4 will do the job.
Pour your blue and black paint into separate boxes and dip your foam shapes into them, ensuring that the undersides are completely and generously covered with paint. Wipe off any excess paint to avoid dripping and smudging, and press the shape down slowly. Apply pressure on the entire surface to ensure the whole shape is stamped down and there aren't any gaps.

Stamp the eye and eyebrow in black and the rest of the image in blue.
Apply your glue with a palette knife inside the petals, leaving a blue outline, and sprinkle your glue generously over them. Fill in lashes, dots and triangles with aqua 3D paint (like those in the original) and paint the inside of your eye white.
You can make your 3D paint look like the embroidery on the original by drying it briefly with a hairdryer (excellent substitute for a heatgun - and a microwave, as it turns out!) until it becomes tacky, and giving it a choppy, grooved texture with a scalpel.

Finally, use your 3D paints to do the sleeve design. If you want to use mine as a template, it's about A4 size.

Here's looking at you, kids!

Sunday 9 February 2014

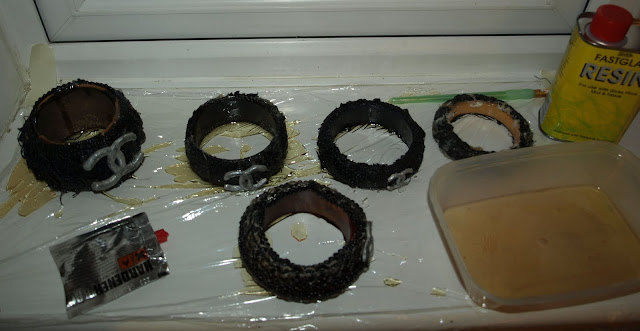
Tweedle-smart! - How to DIY a Chanel tweed bracelet

Chanel your upcycling ingenuity to give some old bangles and tweed a new lease of life!

You will need...


Difficulty

Very easy

It helps to be good at crafting shapes out of clay if you do want to include the Chanel logo. If you'd rather do your own design or use a silver charm instead it's super-easy!

Time

About half an hour per bangle (excluding resin and clay setting time); I made a set of five.

Total cost

Hard to say, as it depends on whether you've got tweed or bracelets lying around. The resin came to about £7, you can get the clay for about £2 and the powder will set you back about £5.50.

As a measure of comparison to my DIY bangles, the price tags of the originals are well into the three-figure region, with some exceeding €1000!

Tempting tweed


Glue your tweed around the outside of your bangle - or bangles.


Use your scalpel and the above template (printed to the correct scale for your bangle - it might take a few attempts) to make your Chanel logo out of polymer clay. Paint it with silver powder while it is still soft and bake it in the oven to set - make sure you follow the instructions carefully!

Glue your logo onto your bangle;you might need to bend it slightly to fit the curve of the side, which you can do if your clay is thin enough. If you can't bend it, fill in the gap with glue.

Mix your resin and hardener, then quickly soak your bangles so that they're completely covered with the mixture. Leave them to dry.

Monday 3 February 2014

Supa(butter)fly: How to DIY a pair of Sophia Webster butterfly sandals

Ripping off the wings of a butterfly.
Image: Moda Operandi Instagram

You will need...


You can use real orange leather as well, if you've got some handy but faux leather will, obviously save you the expense. Also, the thicker and more firm your leather/ faux leather the better.

You need to use sandals which have ankle straps.

Difficulty

Easy

It's basically a quick, easy project but has it's fiddly moments which are worth taking your time on, for an authentic finish.

Time

An evening - between two and three hours, I'd say. I took slightly longer as I was sketching out the template, but if you print it and copy mine, it'll save you a lot of time.

Price

I bought the sandals and leather tape. I already had the orange material and craft tools, so mine came to about £9.

Take a flyer at DIY sandals...


Print out the white butterfly template and scale it - if necessary - so that each side is about as long as your foot but no longer.
Trace the design out onto your orange faux leather and cut it out. For best results, ensure your scalpel blade is extra sharp but try to cut away from your fingers to avoid accidents!
Use your staple gun to put toe straps in place, if there aren't ones already, fixing them to the base. Don't use your staple gun for places where your foot is meant to go underneath as the staples are sharp, stick out and tend to break if you try to bend them flat.
Glue your butterfly pieces in place on your toe and ankle straps. You might want to try your shoes on without them, to get your placement right, and mark them before gluing. Take care to ensure your placement is symmetrical and that the design is visible across the pair.