Monday, 29 September 2014

Chic dip - My take on ombre dip dyeing

Fancy a dip? Why not go maverick with some nifty reconstructing effects? Sure, festival season might be over and dip dyeing tutorials have been done to death on the DIY circuit (not that there aren't some fantastic tutorials out there!) but a girl can go against the grain, do something different and dissect a plaid shirt for some dip dye experimentation, can't she?

You will need


NB: I used Dylon intense violet dye, so I'm going to write my tutorial according to the directions I was given.

The shirt was a £2.50 charity shop bargain - I just thought you should know!

Difficulty
Dyeing

Very easy

Am I telling you anything you don't know? It's no wonder dip dyeing's been a hit on the DIY blogs!

Reconstructing


Moderate


Sadly, this part entails sewing and can be time-consuming especially if, like me, you spent your Sunday afternoon teaching yourself how  yokes and back panels on shirts are constructed! Also, not that I'm hesitant to give a precise difficulty or time for this part because you can try this project with any garment; all garments and panels are constructed differently and require different amounts of technical skill to sew together.


Time
Dyeing

A 15-minute process with a 45-minute wait, plus about half an hour of drying time if you use a hair dryer. Failing that, you would need to do the project in two stages and leave the fabric to dry overnight.

Reconstructing

The back panel took me a few hours to unpick and another two hours to sew back together after dyeing.


Fancy a dip?


Unpick the back panel of your shirt, or whichever panel of whichever garment you intend to use. Don't try to cut it - the seam allowance needs to be intact.


If you're using Dylon fabric dye, dampen your fabric, follow the mixing instructions and dip the desired areas of fabric into the dye. If you're wondering what the silver rounded entity is in the background, it's a plug - I mixed mine in the shower to avoid cataclysmic accidents with very scary, very permanent dye and would recommend that you do the same, hence why I left that little detail in and didn't crop it out.

Dip the entire area(s) you want to cover into the mixture, keep stirring and prod it with a stick. I took the lighter graduating bits out after five minutes and left the remaining fabric in for a further ten, whilst still prodding, because I was told to do so in the dye instructions. And because sometimes I just like to poke things with a stick! I left it for a further 45 minutes before pouring the mixture away, bleaching the area like a woman possessed and rinsing the fabric in cool water to get rid of the excess dye.
Sew the shirt panels back together. Don't worry too much about re-sewing the felled seams, as they're a lot of hassle and I'd describe a shirt of this nature as being more of the aesthetic persuasion than of the hard-wearing variety.

I finished mine off by sewing a faux leather trim across the bottom of the yoke, just to give it a rock 'n' roll ('n' you know, leathery) edge. This part is optional and very versatile. Rather add fringing or embroidered trim? Hey, it's all good!

Monday, 22 September 2014

DIY digest - English rosette

A quick DIY with all the trimmings!


You will need...

Needle and thread

Assorted trims

Two brooches

Shoes

Difficulty

Very easy

In the stitch-it-together-idly-in-front-of-the-TV-and-forget-you're-even-doing-it sense. This one's a quick, straightforward - you could say - mindless act of customising!


Time

About half an hour.


How it's done

Make circles out of each your trims by pinning small darts along the edge of the trim, so that it curves round, until it forms a circle. Cut it., stitch the edges together and stitch the darts in place. Stitch the trims on top of each other, with the widest circle at the bottom, to make a fabric rosette. Repeat this process a second time.

Pierce a hole for each brooch on your shoes. Attach the brooch to the rosette and through the hold on the shoe (I put mine on the strap). Repeat the process for a second time. You might also want to ad it out or cover the back of the brooch to stop it from digging in.


Monday, 15 September 2014

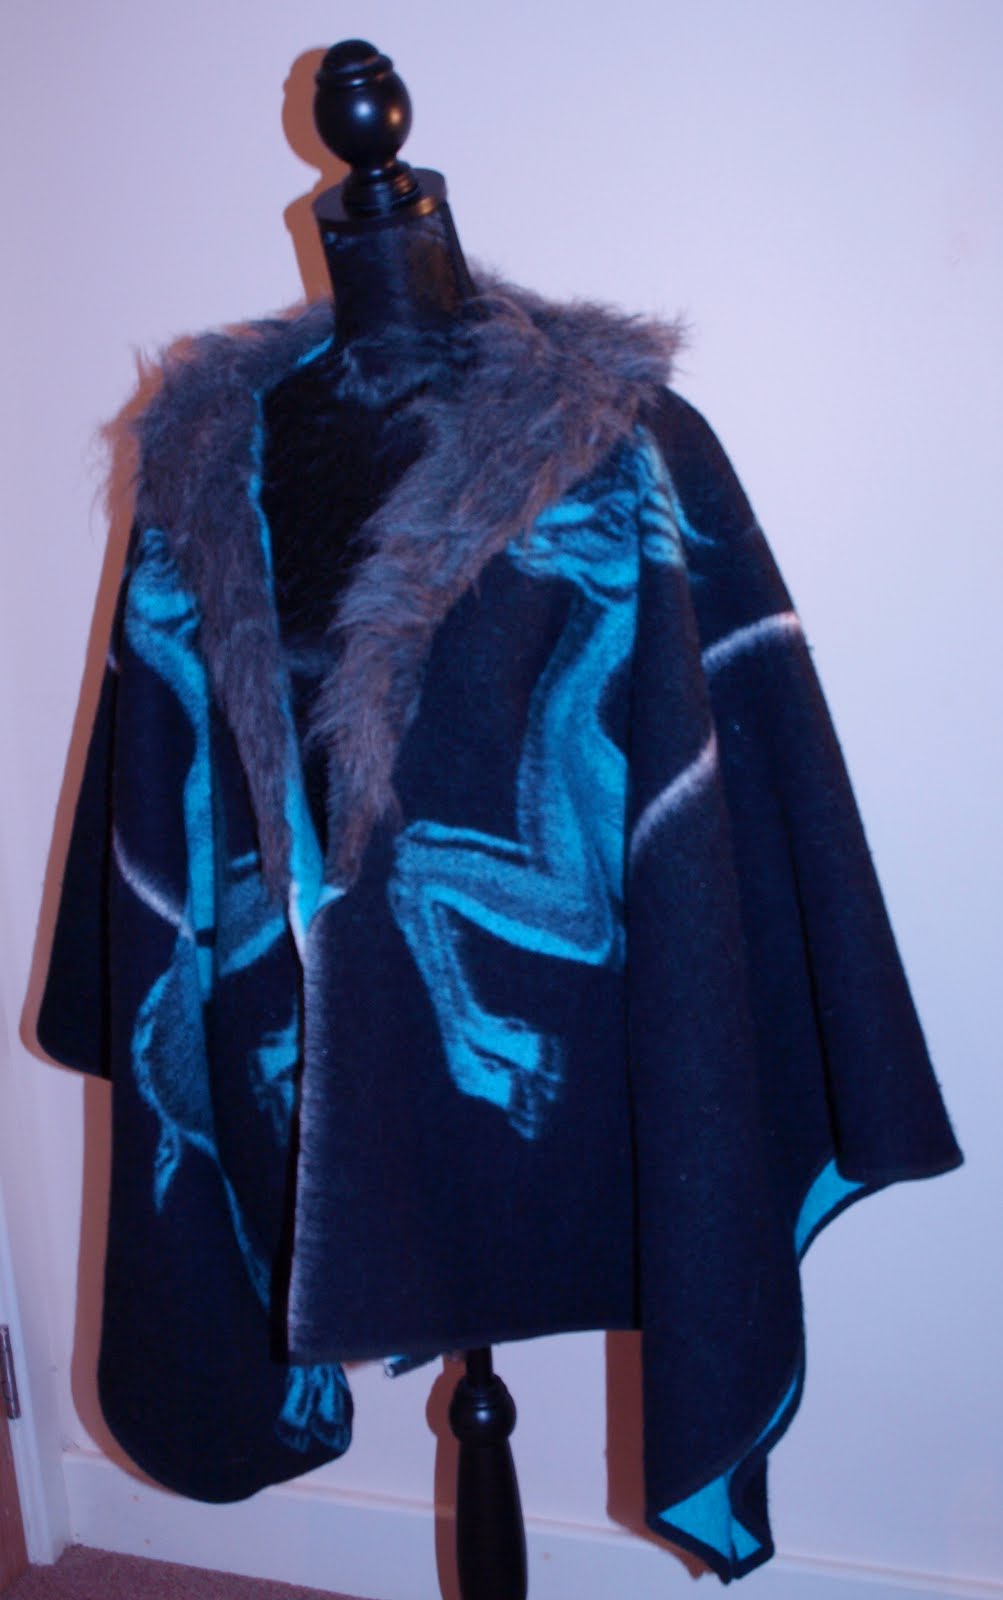
Grand Thrift Autumn - How to upcycle a blanket to make a cape

A cape of new hope for an unwanted blanket!

You will need...


I also added a faux fur trim at the neck but that part's optional.

Difficulty


Quite Easy

It's a simple, straightforward method, in principle, but if, like I am, you're lacking in the height department and working with a heavy blanket, it can be cumbersome at times.


Time

2-3 hours, if you're working with faux fur - that part entails hand-stitching. Otherwise, it's 2 hours. tops.


So, to wrap it up...


Fold the blanket in half. Cut along the centre of the front (only through one layer)  and a 10cm slit at either side of the top.

I cut my area to accommodate the deer design so I wasn't especially paying attention to the precise measurements but the vertical line in the picture was roughly halfway across each side. The diagonal line was at a roughly 45° angle to the vertical line and ended about 10cm from the side edge.


The next step is to turn the blanket wrong-side-up and sew the newly-cut edges together with a 1.5cm seam allowance. Don't worry if they don't meet - they won't. I found that the jagged edge helped to create the three-dimensional angular drape that's hopefully apparent in the pictures I hastily took! Once the triangular gap has been closed up, do what an old sewing teacher of mine once described as a 'stitch in the ditch,' which entails pinning the seams together and stitching along them -the 'ditch,' geddit? Please say you do - my sparing descriptive skills can't cover it any better than that!

Finally, stitch along the raw edges - again., with a 1.5cm seam allowance - and into the corners (at that point, I just sewed along the edge of the blanket's binding.
Turn the blanket right-side-out. If you want to add a faux fur trim like I did, fold back the top corners at the front, pin them down and cover them with faux fur. Cover an area at the back that's the same width as each of the triangles. I sewed together three pieces of faux fur to make my trim. I would also recommend trimming back the fur inside the seam allowance so that it is easier to fold back and pin down at the edges.  I slip stitched the pieces in place along the edges.

...and there you have it!


Wednesday, 3 September 2014

Pretty in Pinko - How to DIY a Pinko knit dress

Give a knit dress or jumper a 'hole' lotta love!

Image: ilovewildfox.com


You will need...

A form-fitting beige knit dress or jumper.

Fray-stop glue.

Small, sharp fabric scissors.

A mannequin can be useful but it's optional.


Difficulty


Very easy

Quick, easy and all in a leisurely evening's work!


Time

About an hour, although I was being a bit of a perfectionist trying to get the design symmetrical - a process for which I'd recommend taking the time!


A quick knit


You might want to take your dress or top in slightly to ensure that it's under tension when you wear it - this will enhance the design. Cut some horizontal and vertical slits (you might want to map them out with some tailor's chalk like I did). Try to get your design as symmetrical as possible. I find it helps to count the number of slits you do on each side and make a mental note of the spacing.
If your top or dress is made from fine knit material, it will probably roll up at the edges when you cut it. Use this quality to manipulate and make the teardrop shapes on your design. At this point, having a mannequin really helps, as it makes it easy to mould the design and see what it looks like in 3D. Secure the shapes and rolled edges with fray-stop glue.


Drumroll, please...


Monday, 25 August 2014

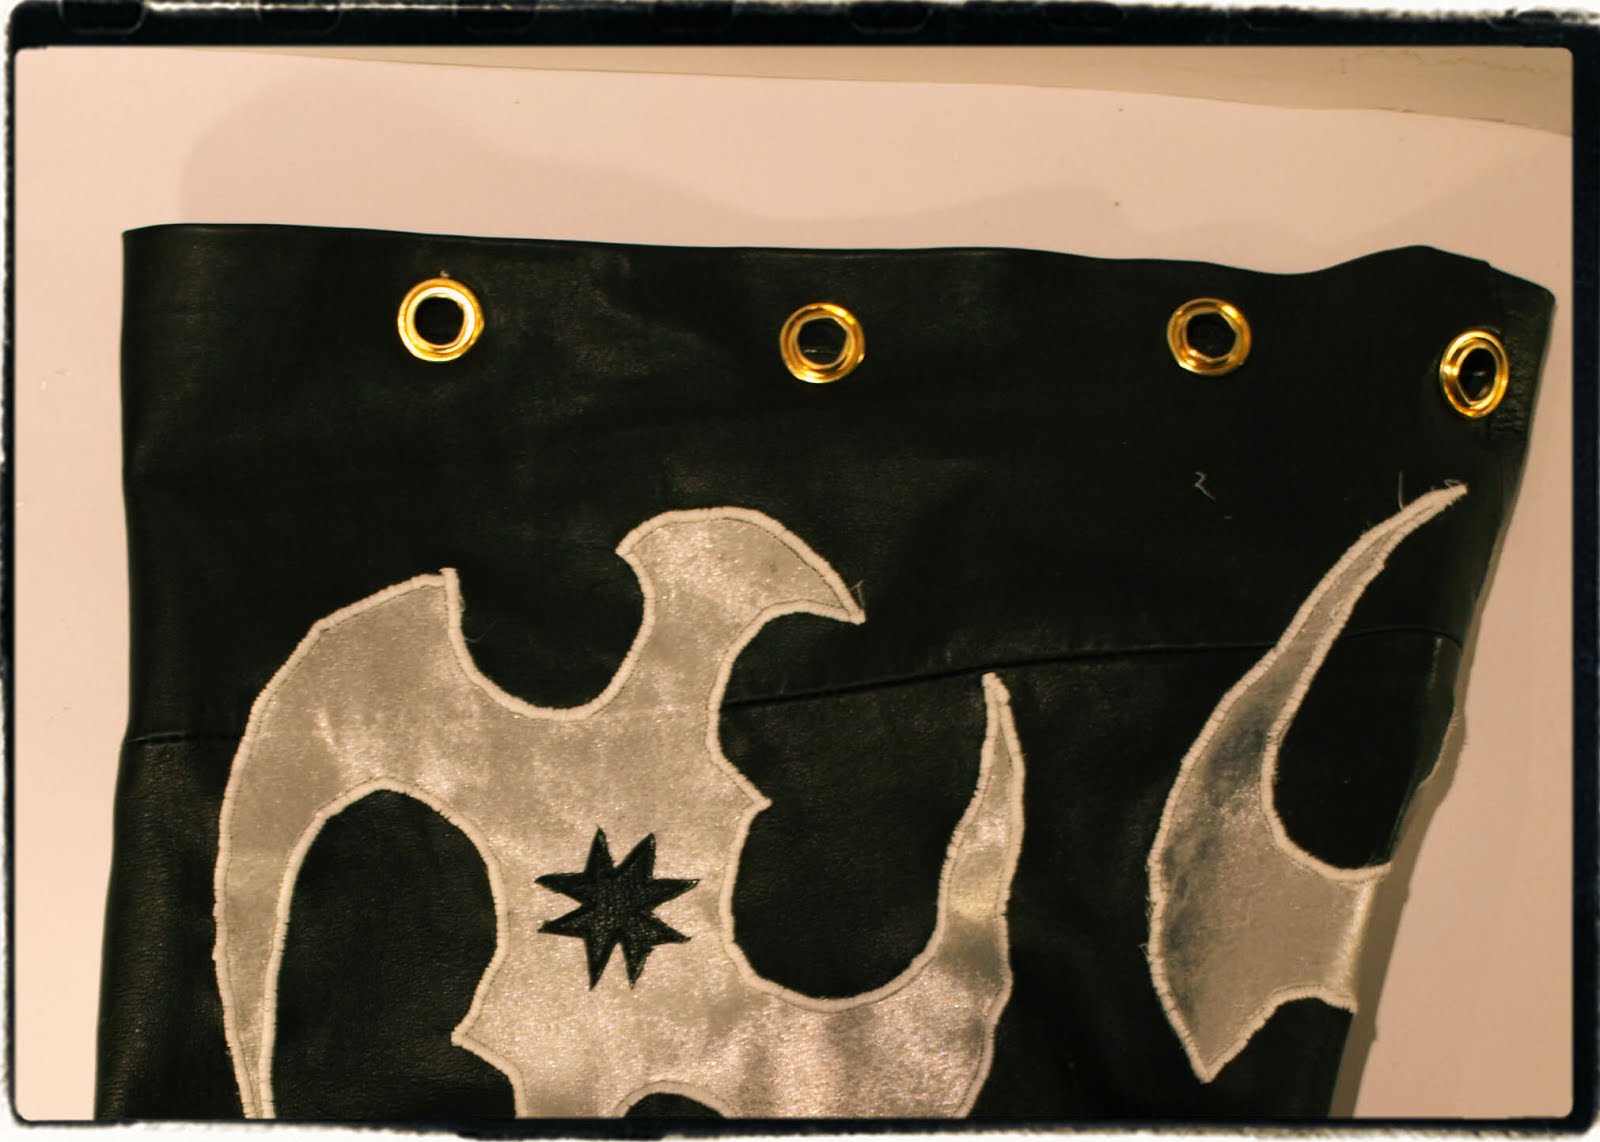
Absolutely Kok-on - How to DIY a Kokon to Zai Eflect Tattoo Patch DrumBag

This project was an indulgent nod to the fringed bag trend of right-now. As a girl of the 90s and early 00s, I'm conditioned to let anything with bold, Eastern-inspired patterns render me weak at the knees and powerless to resist - although the era itself can keep its character tattoos, whose aesthetic value is meh at best and whose capacity for embarrassing mistranslation is simply boundless! I'm talking more about geisha motifs, cheongsam dresses and blossom patterns - dramatic outfit paradigms, in both visual and dream-selling terms. The exoticism will forever have its hold over my imagination and the emotional triggers that incite us to buy or, in my case, senselessly plagiarise!

I have my local vintage/charity shop to thank for a £7 pair of size 14 leather trousers I upcycled to make  the bag; the amount of skins needed for the bag would get me little change from £100 - possibly even more. It might not be 1986 any more but there's always a place for old forgotten leather trousers in my craft room, and my minuscule heart - even if my love entails lacerating them!


You will need


NB: If you want to include a lining, you also need fabric for that. I would recommend a firm satin but most fine non-stretch fabrics would work. I used red jacquard fabric.

You also need a sewing machine and a hammer for the eyelets.

Difficulty

Moderate

I'm going to put this on the easy side of intermediate. It involves sewing and working with patterns, so it would be foolish to assume everyone would find it a walk in the park, but both are minimal and straighforward in this project, so don't let them put you off.


Time 

10-11 hours


Keep calm and Kokon


Cut out the pattern pieces specified in the drawing. I wanted to make my bag quite bog so I used the measurements in the pattern, but you don't have to make yours anything like that size. I'd recommend using a trouser leg (ideally along the thigh) to save time, although you will have to unpick one side, so that you can lie the piece flat. It would also be helpful for calculating the size of the bottom piece by using its width as the circumference of the circle you need to cut.


Cut out three pieces of white satin in the shape shown above (print and trace from the image as a guide, if necessary). Place them along the side of your bag (rectangular piece) and stick the pieces to the leather using craft mount.


Go around each piece using a zig-zag stitch. If you can programme your sewing machine, make the stitches as wide and close together as possible, so that it creates a solid border around the satin. You might need to go around it twice to ensure this.
Sew on the fringing, so that it is wrong(matte)-side-up with the non-fringed part along the hem.I also added some leather stars to the middle of the satin shapes to look authentically like the original and in aid of a slightly weaker argument: YOLO.


Unpick the waistband and belt loops from the trousers. Fold the waistband in half and sew it in place so that it forms a long cord. Sew one of the belt loops to make a figure-of-eight shape for holding what will be our drawstring in place. The other loops are for attaching to the bag as a base for strap attachment.

Sew the side seams together and then attach the top loops and bottom. Since I was working with leather, I found that it helped to use staples along the edge, instead of pins, in order to hold the pieces in place for sewing. Leather is a tough fabric to pin and holes are permanent - although these didn't matter as they were inside the seam allowance.

Repeat the sewing process with the lining and hand-stitch it to the top. I would recommend a slip stitch but you're likely to need a thimble.

Punch holes in the top. You will probably need a hammer or some form of eyelet puncher if you're using the ones that I used. I hated this part because it's loud as hell and - it being late in the process -I had to do it late at night. I prayed I wouldn't get the screaming abdabs from the neighbours for disturbing them. Thankfully I didn't but it was a tense moment, nonetheless!
The final step is to thread the drawstring through the eyelets and attach a strap, if you so wish.
Kok-it!

Saturday, 23 August 2014

Trick for tats - A quick gold temporary tattoo tutorial

No alliterative overkill intended, I just thought I'd share my latest glittering tutorial with you. All you need is a stencil:

... a paintbrush, water and some gold powder from Fimo.


Simply, wet the paintbrush, coat it thickly with gold powder and paint the design through the stencil. The more thickly you apply the powder, the more vibrant the design will be. It's a quick, five minute glamour fix that's perfect for party wear.


NB: I wouldn't recommend it for people with sensitive skin or itchy allergies - I haven't experienced anything, so there's every chance it could be fine, but I don't want to promise that you wouldn't get any nasty reactions if you're susceptible.


Sunday, 10 August 2014

Gravy trainers - how to DIY Dior's floral sequinned trainers

Running stylish with DIY-inspiring customisation from Chanel and Dior!

Image: Stylefrizz.com

It was Dior's Fusion trainers that caught my eye - and captured my imagination - when I decided, on a whim, that an indulgently customised magnum opus like these would be the perfect replacement for my old, worn, sad-looking trainers.

StyleBubble recently described Dior Fusion trainers as "the rise of 21st century contrasting mix and match in fashion.  High and low.  Expensive and cheap.  Couture and sportswear.  Casual and dressy.  The list goes on" in a favourable, admiring post. While the aesthetic, itself might have divided opinion, the conceptual statement of juxtaposition - and resonance, of the high fashion trainer trend being assimilated at the highest tier of couture - convinced me that intricately customised trainers wasn't just inspiration, but relevant and a must for my next project and tutorial.

You will need...


A appreciate that it's a long list, although it does include a lot of basics, such as pens and scissors (just make sure the ones you use are all-purpose) but it's not as bad as it looks (in my over-enthusiasm, I realise I've neglected to include pattern paper and a sewing machine!). The only things you'd need to search for would be the beads, sequins and ribbon, the trainers and the staple gun. You can cut up a sports t-shirt or polo shirt to get airtech fabric  - it's not as illusive or specialised as it sounds.


Difficulty


Challenging

I'm not going to lie -  I underestimated this one, in terms of the work, time and technique involved. Hopefully, you won't find it as hard with my guidance ;)


Time


Two full days - I might as well be honest, here. Owing to the - hopefully hard-wearing - customising techniques I used, it's a bit of an investment, time-wise.


Dior or DIY


Trace about 40 flower shapes into the plastic sheet and cut them out. You might need to use a metallic marker but try not to smudge it. Cut the flowers out and punch holes in the middle of each one.
Cover a trainer in pattern paper (you can use tissue paper) and trace around the edges to make pattern pieces. Once you have traced them, add a small (about half a centimetre) seam allowance using a ruler or graded setsquare and cut them out. Cut out two of each piece in airtech fabric and sew them to make covers.

After you have sewn the covers together, hand-stitch circles of green sequins. Then, stitch a flower, a blue sequin and a blue faceted bead in the middle of each one.


Fold the cover over on the top edge, and onto the wrong (non-customised) side . Slip stitch the top edge to the fabric on the lining of the ankle and the tongue, if possible.

Use the staple gun to attach the cover to the sole of the trainer. Trainers are typically padded at the soles, so, stapling the fabric at the side shouldn't go inside it and into the area where your foot will go, although it's always worth checking so that you don't end up lacerating your feet when you wear them! I tidied mine up with a lick of white fabric paint, but that's optional - you've just got to keep your staples as far out of view as possible.

Finally, hand-stitch the black grosgrain trim along the centre and in a bow shape.