Sunday, 24 June 2012

Carven Electric

Get some powerful prints in the mix, courtesy of Carven...

If hopes an African summer in the traditional, and idiomatic sense, seemed dashed until recently (and still somewhat doubtful, at that) then perhaps it may have explained why African-inspired fashion has yet to feature prominently among the key statements of this season. Sure, many key pieces that excited the fashion press were of a distinctly out-of-Africa nature - the construction and colour palette at Donna Karan and the ethnically-inspired embellishment at Burberry, to name but two - but aside from a few neon and boldly coloured ikat-style geometric prints, it appears to have kept a relatively low profile... until now. With this and the major trend towards bright colour (hell, it's the only sure-fire way to brighten up our days where some of us are!) in mind, I decided to take on Carven's tribal printed shirt from the picture below:


Writers (just to use an umbrella term - advances in modern technology have quite blurred the lines as to which source comes primarily from where these days!) have mentioned likenesses to Missoni, but I think I can go one better than that. Looking at the collection, yes, I too could imagine it being conjured up by the Missoni team, using offcuts from British-Nigerian artist, Yinka Shonibare's Here installation or the prints from his work for the Un Ballo Maschera film. Looking at how the tribal geometric prints intertwine with sketched linear patterns, I had to throw in my two DIY-driven cents on how to get the authentic look. So, in for a penny, in for a pound...

You will need


Two paintbrushes including one good one and one really soft, cheap one you don't mind vandalising

Fabric paint in:
Red
White
Lemon yellow
Apple green
Olive green (mmmm, greens!)

Black permanent fabric marker

Scissors

Patternmaster or graded setsquare

Gold gel pen

White shirt collar and all purpose adhesive (optional)

Difficulty


Very easy 

Very easy, in fact I suppose the only reason the scissors icon isn't on the far left-hand side is to cover my back with creating the ikat-style effects. It may take a while to get the feel for it and you might want to practise on a scrap of material, but it's very easy when you know how. The scribbling part's easier still.


Time

It took me about 7 hours per side. That said, I was pretty distracted and, if I'm honest, that time went pretty fast. In fact, I'd describe the process as really enjoyable colouring in (which I hadn't done in a fair few years!)

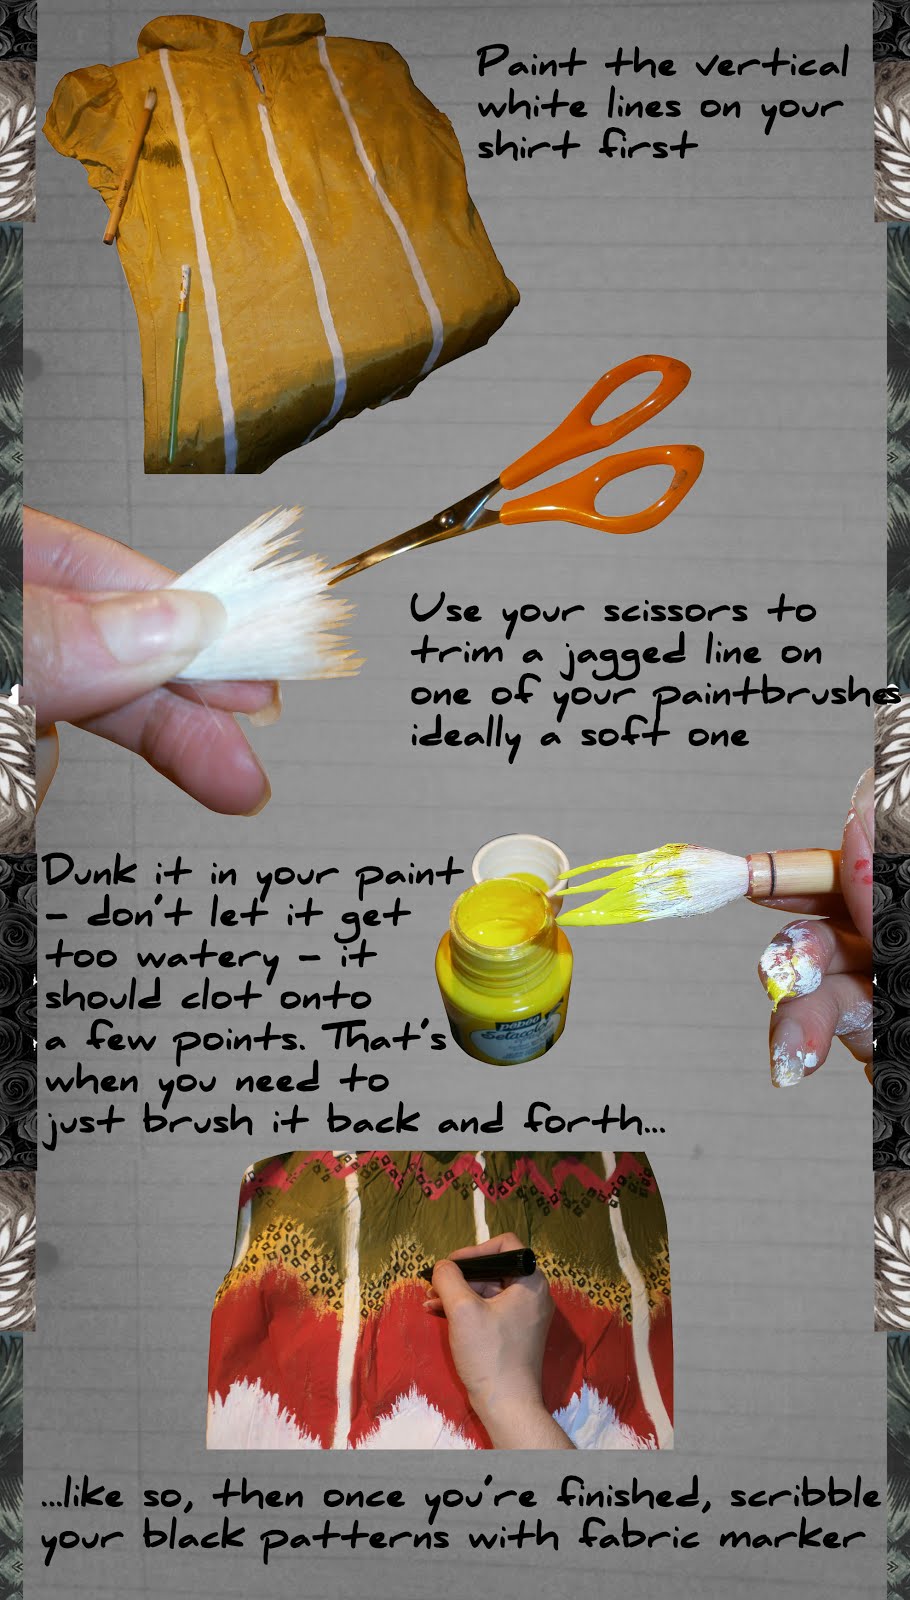
The process - as communicated in the form of interpretive dance:


Only joking - but I did put together a collage for easy reading.


Friday, 22 June 2012

DIY Digest: Get cape, wear cape, flaunt

Can't stitch 2 pieces of fabric together? Don't fancy the mess or challenge of sewing? Haven't actually got 12 free hours at your disposal but need a quick, no-fuss revanping tip? Can do!

I was spurred on to introduce my first quick, super-easy DIY tip - that's so easy I kind of feel cheeky calling it DIY, rather a subtle-but-effective styling fix - to make it easier to post more often and to share my creative solutions with readers who aren't that confident with technically demanding projects. To leave something for everyone, in other words. The idea for this particular one also came to me from working in an overly air-conditioned office and managing to mess up my cardigan en route. I found myself resorting to using my scarf as a kind of security blanket, whilst thinking, wouldn't it double up nicely as a cape? Okay, arguably, this brainwave should have happened around November when capes were more of the moment, but then, frankly so should this disappointing (though nonetheless enduring) weather! Besides, with the amount I paid for it, it's heartening to know my black devoré skull scarf can serve a second purpose!


So, for Operation: Fabulous Wooby, you will need


A generous-sized rectangular scarf

A nice matching brooch or a safety pin

...and, ooh, a good 30 seconds at your disposal.


Think you can manage? Here's how it's done


Sunday, 17 June 2012

Scarf Ace

Scarf printed tops are the signature look of the current season - room for one more?


This concept of this tutorial came to me as a creative solution to the issue of what to wear to a festival (and still look fabulous whatever the harsh, conspiring weather!) I came up with a kaftan-style scarf printed top that's lightweight, cool and not too clingy. In fact, the advantage of its shape is the freedom of movement that it allows, as well as the versatility - it can be worn sleeveless with the drapes cascading along the sides or wrapped around your arms for extra warmth. What's more, if you glam it up and choose a silk patterned scarf, it's as chic for day wear as it is classy for the evenings.

Now that we're well into the season for spring/summer 2012 (read, just about getting started as far as the weather's concerned), I've noticed that the fashion statement to shout the loudest this season has been the Dolce & Gabbana-inspired scarf print look. The above examples are, well, just to refresh your memory, if, indeed they're needed (in which case, I do hope you enjoyed your holiday in space and eagerly await your postcard) Scarf prints are just one of the key looks inspired by Dolce & Gabbana, as they hold a well-heeled (and high-heeled I should suspect) foot in the camp of couture, with their collections being among the most talked about, season upon season. What's more, nostalgic romanticism was at the core of their creative inspiration from the start, the scarf prints of this season have just been a novel, contemporary approach, as is inevitable in fashion. As Domenico Dolce once said: "I like time. Now is not two minutes later and it's never like before. Repetition doesn't exist." Amen to that, and to alternate interpretation, Mr D.

Speaking  of new sartorial incarnations, the kaftan-style top I came up with was meant as an easy tutorial, ideal for all abilities and levels of experience. I also find it's great as a kind of all-purpose top, ideal for evening wear, throwing over a bikini at the pool and even for wearing with cut off shorts at a festival. It's easy to move in and great for adding a touch of elegantly draped finesse to an outfit...though I say it myself!

You will need


A patterned scarf, about 1m x 1m (H&M currently do one for £7)

About 1.5m ribbon that's strong and wide (mine was 3.5cm in width, priced at £4.35 from John Lewis, however you can buy it much more cheaply at a market. Also I'd recommend you choose a versatile colour that's not too hard to match like black or white)

Sewing machine

Thread that matches your scarf

Sewing scissors (the smaller and sharper the better)

Embellishment trims and all purpose/contact adhesive (optional. Quick tip: A thin covering of glue on the ends of your ribbon is a great and subtle way to stop it from fraying)

Tape measure

Patternmaster or a ruler and setsquare for measuring points on the scarf and making sure they're measured along straight lines.)

Metallic gel pen

Sewing pins

Difficulty


So-so

Just because you'll more than likely be working with a satin scarf or even something more sheer like chiffon, which can be a bit of a fiddle to sew. My advice is to just take care and take your time to avoid any nasty snagging and ripping.

Time

It took me 5-6 hours but I was pretty distracted so normally it'd probably be a lot less.


 So, here's how to give your scarf a second life...


Tuesday, 5 June 2012

Lovely Jubilee - Part 2

You will need

A metal clutch bag

Diamantés from seller crystalgems2010 (24408) on Ebay:

2000 in silver priced at £3.49 (total: £7.78 with postage and packing)

500 (approx) in black, priced at £2 (total £2.80)

250 (approx) each in red, yellow and blue £1.29 (total for the three with postage and packing £6.27)

Gemstone glue – £3.49 from Hobbycraft

Gel pens in gold, silver, black, blue and red

A few sheets of plain white A4 paper

Sticky back plastic

Spray mount

Scalpel

Tweezers 

Scissors

Masking tape

Time

15-20 hours

Difficulty


Fiddly and a good exercise for the old patience at times but worth it.


The method in the madness...

Check out this video and find out!


The Result


Lovely Jubilee - Part 1

Frustratingly, owing to technical difficulties, my two Jubilee-themed entries have had to go live later than I would have liked. I won't bore you or appear to beg for your sympathy by going into details on he matter. If anything, I'd liken said glitches to the doomed off-ramp area of the Miami MacArthur Causeway on a bustling Saturday, i.e. don't go there! So, writing with a kind of preemptively retrospective angle, here's how I, here at Chic Cheat, celebrated the biggest national and international news of this past week (I mean, the utterly enthralling story about the drugged man eating a vagrant's face was tempting and all, but, you know, when in Rome...)The first thing I crafted in honour of Her Majesty's celebrated 60-year reign was this Alexander McQueen Union Jack clutch bag:


Difficulty

Very easy

Not my most adventurous entry, or ambitious, but then that means it's not my most challenging, either. For all those new to Chic Cheat or to DIY fashion as a whole, I'd recommend this tutorial as a great way to start.

Time

About 10 hours - hazarding a guess here, as I dipped in an out of this with a lot of distractions, so it could well be less, you'll surely be pleased to know.

You will need

A metal clutch bag (prices may vary) I tried it on a converted jewellery box, and although I wouldn't recommend it, the same method would apply to - and work on - the former.

Pack of 250 diamantes in royal blue and red, each priced at £1.29 with 80p postage and packing, bought on Ebay from a seller called crystalsandgems2010 (24408): Total: £4.18

2.5m ribbon in red and a slightly wider ribbon in white (wider by about 4mm) prices may vary, as would appropriate widths, depending on the clutch bag you use

Fimo clay £2 from Cuddly Buddly

Blue Dylon opaque fabric paint £3 and a paintbrush

Gold paint by Humbrol about £4 on Ebay

Two small pearl beads (optional)

Gemstone glue - £3.49 from Hobbycraft

Faceted red  and blue beads (bonus if you can get them in different sizes - prices may vary but I'd recommend Ebay for this one)

Craft mount

Tweezers

Contact adhesive (£2.08 per tube at B&Q)

You need to...


Use your Fimo clay to sculpt a skull-shaped clasp cover for your clutch. Start by kneading the clay to get it soft enough to work with. You can also sculpt the back around the clasp of your clutch by building it over the fastening and removing it once you are finished.

Following the directions closely on the packaging, leave your clay skull to bake in the oven.


Paint your skull gold.


Paint your clutch blue, unless it is already that colour.


Cut your ribbon to fit in a Union Jack pattern on each side. Craft mount it to your bag, starting with the white before going onto the red.


Using your tweezers, glue on your faceted beads and diamantes.


After your gemstone glue as dried, repeat the ribbon and gem processes on the other side.

Finally, using your contact adhesive, glue your skull in place and, if you have decided to include the two pearls I recommended earlier, glue them in the eye sockets.


...So there you have it.